A deep dive into Rack for Ruby
posted by Ayush Newatia
30 October, 2024
Rack is the foundation for every popular Ruby web framework in existence. It standardises an interface between a Ruby application and a web server.
This mechanism allows us to pair any Rack-compliant web server (Puma, Unicorn, Falcon etc.) with any Rack-compliant web framework (Rails, Sinatra, Roda, Hanami, etc).
Separating the concerns like this is immensely powerful and provides a lot of flexibility in choice.
It does, however, come with limitations. Rack operates on an assumption that every request must provide a response. This means there’s no facility for persistent connections which would enable pathways like WebSockets.
Up until Rack 2, developers had to make use of a hacky escape hatch to take over connections from Rack to implement WebSockets or similar peristent connections. Rack 3 improves this by formalising an interface for persistent connections.
The basics
Before we look into how that works, let’s backtrack and take a closer look at Rack itself.
A barebones Rack app
A basic Rack app looks like:
class App
  def call(env)
    [200, { "content-type" => "text/plain" }, ["Hello World"]]
  end
end

run App.new
The env is a hash containing request specific information such as HTTP headers. When a request is made, the call method is called and we return an array representing the response.
The first element is the HTTP response code, in this case 200. The second element is a Hash containing any Rack and HTTP response headers we wish to send. And the last element is an array of strings representing the response body.
Let’s organise this app into a folder and run it.
$ mkdir rack-demo
$ cd rack-demo
$ bundle init
$ bundle add rack rackup
$ touch app.rb
$ touch config.ru
Fill in app.rb with the following:
class App
  def call(env)
    [200, { "content-type" => "text/plain" }, ["Hello World"]]
  end
end
And config.ru with:
require_relative "app"

run App.new
We can run this app using the default WEBrick server by running:
$ bundle exec rackup
The server will run on port 9292. We can verify this with a curl command.
$ curl localhost:9292
Hello World
That’s got the basic app running! WEBrick is a development-only server so let’s swap it out for Puma.
Changing web servers
$ bundle add puma
Now try running rackup again and you’ll see it’s automatically detected Puma in the bundle and started that instead of WEBrick!
$ bundle exec rackup
Puma starting in single mode...
* Puma version: 6.4.2 (ruby 3.2.2-p53) ("The Eagle of Durango")
*  Min threads: 0
*  Max threads: 5
*  Environment: development
*          PID: 45877
* Listening on http://127.0.0.1:9292
* Listening on http://[::1]:9292
Use Ctrl-C to stop
I recommend starting Puma directly instead of using rackup as that allows us to pass configuration arguments should we want to.
$ bundle exec puma -w 4
[45968] Puma starting in cluster mode...
[45968] * Puma version: 6.4.2 (ruby 3.2.2-p53) ("The Eagle of Durango")
[45968] *  Min threads: 0
[45968] *  Max threads: 5
[45968] *  Environment: development
[45968] *   Master PID: 45968
[45968] *      Workers: 4
[45968] *     Restarts: (✔) hot (✔) phased
[45968] * Listening on http://0.0.0.0:9292
[45968] Use Ctrl-C to stop
[45968] - Worker 0 (PID: 45981) booted in 0.0s, phase: 0
[45968] - Worker 1 (PID: 45982) booted in 0.0s, phase: 0
[45968] - Worker 2 (PID: 45983) booted in 0.0s, phase: 0
[45968] - Worker 3 (PID: 45984) booted in 0.0s, phase: 0
This basic app demonstrates the Rack interface. An incoming HTTP request is parsed into the env Hash and provided to the application. The application processes the request and supplies an Array as the response which the server formats as sends to the client.
Rack compliance in frameworks
Every compliant web framework follows the Rack spec under the hood and provides an access point to go down to this level.
In Rails, we can send a Rack response in a controller as:
class HomeController
  def index
    self.response = [200, {}, ["I'm Home!"]]
  end
end
Similarly in Roda:
route do |r|
  r.on "home" do
    r.halt [200, {}, ["I'm Home!"]]
  end
end
Every Rack compliant framework will have a slightly different syntax for accomplishing this, but since they’re all sending Rack responses under the hood, they will have an API for the developer to access that response.
You can find the full Rack specification on GitHub. It’s relatively accessible for a technical specification.
As this demo shows, Rack operates under the assumption that a request comes in, is processed by a web application, and a response is sent back. Throwing persistent connections into the mix totally breaks this model, yet Rack-compliant frameworks like Rails implement WebSockets.
Socket hijacking
In the previous post, we set up the most basic Rack app possible and learned how to process a request and send a response.
In this post we’ll learn how to take over connections from Rack so we can hold persistent connections to enable pathways such as WebSockets.
First, let’s look at how an HTTP connection actually works.
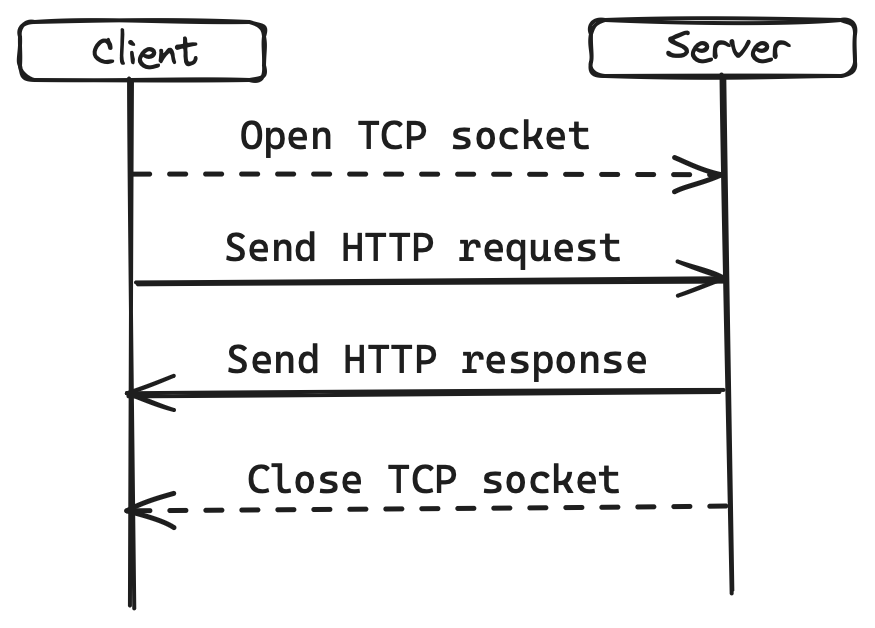
As the diagram shows, a TCP socket is opened and the request is sent to the server. The server responds and closes the connection. All communication is in plain text.
Using a technique called socket hijacking, we can take control of a socket from Rack when a request comes in. Rack offers two techniques for socket hijacking:
- Partial hijack: Rack sends the HTTP response headers and hands over the connection to the application.
- Full hijack: Rack simply hands over the connection to the client without writing anything to the socket.
Partial hijacking
This is how you do a partial hijack:
class App
  def call(env)
    body = proc do |stream|
      5.times do
        stream.write "#{Time.now}\n\n"
        sleep 1
      end
    ensure
      stream.close
    end

    [200, { "content-type" => "text/plain", "rack.hijack" => body }, []]
  end
end
Run the above app and curl to it, you’ll see it writes the time at 1 second intervals.
$ curl -i localhost:9292
Full hijacking
This is how you’d do a full hijack:
class App
  def call(env)
    headers = [
      "HTTP/1.1 200 OK",
      "Content-Type: text/plain"
    ]

    stream = env["rack.hijack"].call
    stream.write(headers.map { |header| header + "\r\n" }.join)
    stream.write("\r\n")
    stream.flush

    begin
      5.times do
        stream.write "#{Time.now}\n\n"
        sleep 1
      end
    ensure
      stream.close
    end

    [-1, {}, []]
  end
end
This is a bad practice. Don’t do this. I’ll say again, DO NOT do this unless you really really know what you’re doing. This approach rife with gotchas and weird behaviour.
Streaming bodies
While full hijacking is a terrible idea, partial hijacking is a useful tool. But it still feels hacky so Rack 3 formally adopted that approach into the spec by introduction the concept of streaming bodies.
class App
  def call(env)
    body = proc do |stream|
      5.times do
        stream.write "#{Time.now}\n\n"
        sleep 1
      end
    ensure
      stream.close
    end

    [200, { "content-type" => "text/plain" }, body]
  end
end
Here we provide a block as the response body rather than an Array. Rack will keep the connection open until the block finishes executing.
There’s a huge gotcha here when using Puma. Puma is a multi-threaded server and assigns a thread for each incoming request. We’re taking over the socket from Rack, but we’re still tying up a Puma thread as long as the connection is open.
Puma concurrency can be configured but threads are limited and tying one up for long periods is not a good idea. Let’s see this in action first.
$ bundle exec puma -w 1 -t 1:1
In two separate terminal windows, run the following command at the same time:
$ curl localhost:9292
You’ll see that one request is immediately served but the other is held until the first one completes. This is because we started Puma with a single worker and single thread meaning it can only serve a single request at a time.
We can get round this by creating our own thread.
class App
  def call(env)
    body = proc do |stream|
      Thread.new do
        5.times do
          stream.write "#{Time.now}\n\n"
          sleep 1
        end
      ensure
        stream.close
      end
    end

    [200, { "content-type" => "text/plain" }, body]
  end
end
Now if you try the above experiment again, you’ll see both curl requests are served concurrently because they’re not tying up a Puma thread.
Once again I must warn against this approach unless you know what you’re doing. These demonstrations are largely academic as systems programming is a deep and complex topic.
Falcon web server
Since the threading problem is specific to the Puma web server, let’s look at another option: Falcon. This is a new, highly-concurrent Rack-compliant web server built on the async gem. It uses Ruby Fibers instead of Threads which are a cheaper to create and have much lower overhead.
The async gem hooks into all Ruby I/O and other waiting operations such as sleep and uses these to switch between different Fibers ensuring a program is never held up doing nothing.
Revert your app to the previous version where we’re not spawning a new thread:
class App
  def call(env)
    body = proc do |stream|
      5.times do
        stream.write "#{Time.now}\n\n"
        sleep 1
      end
    ensure
      stream.close
    end

    [200, { "content-type" => "text/plain" }, body]
  end
end
Then remove Puma and install Falcon.
$ bundle remove puma
$ bundle add falcon
Run the Falcon server. We need to explicitly bind it because it only serves https traffic by default.
$ bundle exec falcon serve -n 1 -b http://localhost:9292
The server is only using a single thread, which you can confirm with the below command. You’ll need to grab your specific pid from Falcon’s logs.
$ top -pid <pid> -stats pid,th
The thread count printed by the above command will be 2 because the MRI uses a thread internally.
Try the earlier experiment again and try running two curl requests simultaneously.
$ curl localhost:9292
You’ll see they’re both served at the same time thanks to Ruby Fibers!
Falcon is relatively new. Ruby Fibers were only introduced in Ruby 3.0. Since Falcon is Rack-compliant, it can be used with Rails too, but the docs recommend using it with v7.1 or newer only. As such, it’s a bit risky to use Falcon in production but it’s very exciting development in the Ruby world in my opinion. I can’t wait to see its progress in the next few years.
We’ve now learned how to create persistent connections in Rack and how to run them in a way that doesn’t block other requests, but the use cases so far have been academic and contrived. Let’s look at how we can use this technique in a practical way.
SSEs and WebSockets
The web has two formalised specifications for communication over a peristent connection: Server Sent Events (SSEs) and WebSockets.
WebSockets are very widely used and quite popular, but SSEs are not nearly as well known so let’s dig into those first.
Server Sent Events
SSEs enables a client to hold an open connection with the server but only the server is able to publish messages to the client. It isn’t a bi-directional protocol.
SSEs are a JavaScript API so let’s modify our app to serve an HTML page with the required script:
class App
  def call(env)
    req = Rack::Request.new(env)
    path = req.path_info

    case path
    when "/"
      sse_js(env)
    end
  end

  private

    def sse_js(env)
      body = <<~HTML
        <!DOCTYPE html>
        <html>
          <head>
            <meta charset="utf-8">
            <meta name="viewport" content="width=device-width, initial-scale=1">
            <title>SSE - Demo</title>

            <script type="text/javascript">
              const eventSource = new EventSource("/sse")
              eventSource.addEventListener("message", event => {
                document.body.insertAdjacentHTML(
                  "beforeend",
                  `<p>${event.data}</p>`
                )
              })
            </script>
          </head>
          <body>
          </body>
        </html>
      HTML

      [200, { "content-type" => "text/html" }, [body]]
    end
end
The API is encapsulated in the EventSource class and new messages from the server trigger events which we’re listening for. Next we need to build the endpoint to send the events:
class App
  def call(env)
    req = Rack::Request.new(env)
    path = req.path_info

    case path
    when "/"
      sse_js(env)
    when "/sse"
      sse(env)
    end
  end

  private

    def sse_js(env)
      # ...
    end

    def sse(env)
      body = proc do |stream|
        Thread.new do
          5.times do
            stream.write "data: #{Time.now}!\n\n"
            sleep 1
          end
        ensure
          stream.close
        end
      end

      [200, { "content-type" => "text/event-stream" }, body]
    end
end
From a server point of view, it’s fairly similar to the streaming bodies example in the previous part. It’s worth noting the content-type header and the format of string written back to the client.
Run the server (make sure you switch back to Puma):
$ bundle exec puma
Open up a web browser to localhost:9292 and you’ll see the time written to the document 5 times at 1-second intervals.
This technique is great when the server just needs to notify the client about updates. The above example was fairly contrived as it uses a loop so let’s look at how we can use this technique in a real application.
Ruby Queues
Ruby provides a Queue data structure for communication between threads. We can use that to publish data back to a client. Let’s stick with the same use case of publishing the current time 5 times at 1-second intervals, but this time we’ll publish it from a background thread.
class App
  def call(env)
    # ...
  end

  private

    def sse_js(env)
      # ...
    end

    def sse(env)
      queue = Queue.new
      trigger_background_loop(queue)

      body = proc do |stream|
        Thread.new do
          loop do
            data = queue.pop
            stream.write "data: #{data}!\n\n"
          end
        ensure
          stream.close
        end
      end

      [200, { "content-type" => "text/event-stream" }, body]
    end

    def trigger_background_loop(queue)
      Thread.new do
        5.times do
          queue.push(Time.now)
          sleep 1
        end
      end
    end
end
In the above example, we spawn another background thread to push the current time to the queue every second. In the SSE thread, we call queue.pop which blocks until something is added to the queue.
Using this technique, we can make use of a pub/sub system such as Redis to add data to the queue from a background thread, which is then published to the client.
Next, let’s look at WebSockets.
WebSockets
WebSockets are a binary, bi-directional protocol for client-server communication. They’re widely used in the modern web and underpins Rails’ Action Cable framework.
A WebSocket is created using an HTTP connection, but as a protocol, it’s completely independent of HTTP.
To create a WebSocket connection, the client must make an HTTP request with the headers:
Connection: Upgrade
Upgrade: websocket
The server will respond with the status 101 meaning Switching Protocols. The same TCP connection used for the HTTP request is now upgraded to a WebSocket connection.
We won’t get into the nitty-gritty of the WebSocket protocol in this post. It’s fairly fiddly since its a binary protocol. Starr Horne has written an amazing article on the topic if you’re curious.
Let’s look at how we can upgrade a TCP socket to a WebSocket connection.
Upgrading from HTTP to WebSockets
As described above, we’ll need to send a 101 response, after which we need to write to the socket using WebSockets’ binary protocol for the communication to work.
require 'digest/sha1'

class App
  def call(env)
    req = Rack::Request.new(env)

    key = req.get_header("HTTP_SEC_WEBSOCKET_KEY")
    response_key = Digest::SHA1.base64digest([key, "258EAFA5-E914-47DA-95CA-C5AB0DC85B11"].join)

    body = proc do |stream|
      response = "Hello world!"
      output = [0b10000001, response.size, response]
      stream.write output.pack("CCA#{ response.size }")
    ensure
      stream.close
    end

    [101, { "Upgrade" => "websocket", "Connection" => 'upgrade', "Sec-WebSocket-Accept" => response_key }, body]
  end
end
We have to create a response key to securely create the connection. The UUID used to generate it is a global constant found in the specification. We won’t go into the binary format of the string we’re writing into the WebSocket connection, but it’s all described in Starr Horne’s article if you’re curious.
Demo
Run the server:
$ bundle exec puma
The easiest way to create a connection is to use a WebSocket client. I recommend websocat.
$ websocat ws://127.0.0.1:9292/
You’ll see the string Hello world! printed out! The connection is now active. In theory, we can write and receive messages over this socket now. We haven’t implemented anything on the server to receive or publish messages though, so it won’t yet work in practice.
Conclusion
That concludes our deep dive into Rack. We looked at what Rack was and how to set up a basic Rack app. We then learned about socket hijacking to maintain persistent connections.
And lastly, we used two specifications provided by the web platform to communicate over persistent connections: Server Sent Events (SSEs) and WebSockets.
SSEs are a unidirectional protocol to send data from the server to the client. It’s plain text just like HTTP. WebSockets are a bi-directional protocol to communicate between a server and a client and it’s a binary protocol.
Always remember that persistent connections come with challenges when using a threaded web server like Puma. A persistent connection ties up a thread and can cause significant performance issues unless you open a sizeable can of worms to implement your own threading mechanism.
This post was initially published on AppSignal's blog.